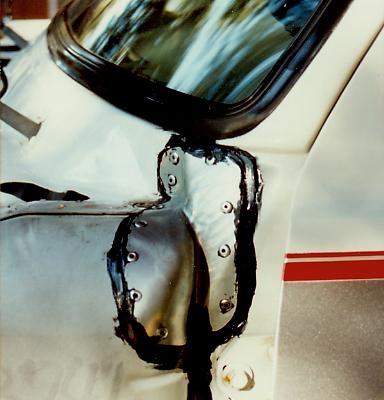
Cowl Fix
Fixing a Cowl Crack on my First Generation Dodge Ram
The cowl cracks on the First Gen Dodges are a common problem. This will cause a "squeaking" sound from up underneath the dash and A pillar. If you open your door and look through the door jam at the cowl. Most of the time you can see the cracks.
To do this chore, you have to take the side fenders off, front bumper, and the front valance pan, and grill. On the pass. side, dont forget about the antenna. Everything is a one man job except for the hood.
Dodge makes the replacement cowl panels to do the job. Here is a list of the parts needed:
Parts:
- AR 4797018 Cowl Reinforcement-Left
- AR 4797019 Cowl Reinforcmmt-Right - UPDATE: Right side panels are no longer made and are no longer in stock by Dodge.
- (qty 3) -P/N 4746924 3/16" Structural Rivet
- (qty 3) P/N - 08456 3M Panel Adhesive Compound 30
- (qty 1) 3M P/N - 08198 Applicator Gun
- (qty 1) 3M P/N - 08193 Applicator Nozzle
1. Remove the wiper arms.
2. Remove the cowl screen.
3. Remove the hood with the hood hinges attached.
4. Remove the front fender or fenders.
5. Drill stop the crack ends with a 1/16" drill.
6. Grind any rough edges from the area where the reinforcement will be secured. Grind the surface of the area to provide a good surface for the adhesive to adhere.
7. Grind the inside surface of the patch.
8. Grind away any paint from the vertical seam to prepare for application of adhesive (See Illustration) and clean the area with a solvent such as Mopar Super Kleen, P/N 4318015.
9. Clean the cowl and the reinforcement with a solvent such as Mopar Super Kleen, P/N 4318015.
10. Assemble the adhesive cartridge to the applicator gun following the manufacturers instructions.
11. Apply adhesive to the cowl approximately 1/16" thick and apply a bead to the vertical seam as shown.
12. Position the patch on the cowl.
13. Drill the 3/16" holes in the cowl and install the rivets, one at a time, until the patch is secure. Clean any excess adhesive from around the reinforcement.
14. Allow 4 hours for the epoxy to cure.
15. Prime the area and apply a coating of rustproofing to ndnimize corrosion.
16. Seal the panel joint seam at the windshield gasket with RTV to prevent leaks (See Illustration).
17. Install the fender and hood.
18. Install the cowl screen and wiper arms.
Written By: Monty
