AirDog & Tank Vent
AirDog 150 & Tank Vent Mod Install On A Megacab
Ongoing discussion about this article can be found by Clicking Here.
Original Writeup By 53 Willys
THIS WAS DONE ON A MEGACAB, NOT ALL STEPS MAY APPLY THE SAME
Well after TONS of reading and research I finally decided on a fuel system that fit my needs and wants. I went with the AirDog 150 cause of it's ability to separate air and vapor from the fuel..it's small all in one package, cheap long lasting filters, 2-3micron filtering, water separator, long lasting QUIET motor/pump and a great price right now as well.
My install is a little different then the way the AirDog instructions install, so I will show you all what I did.
When I got my AD150 it came with a 1/2" drawstaw..but after doing some looking I really liked the way the Vulcan "drawstaw II" installed so I ordered one and I decided to use the AD pickups bulkhead fitting to do the tank vent mod.
Here is what I ordered from Vulcan to help with my install...
Vulcan DrawstawII make sure it is the 1/2" version
CP3 fitting with FP sensor port
I was worried about running out of fuel at 1/4 tank so a DTR member suggested taking the bed off to do the install to make sure the tank stayed in it's installed form. With the tank on the ground or jack it may get pushed up in the middle where the drawstaw is then when you raise the tank back into it's mounts the bottom of the tank drops down away from the Drawstaw causing stumbling and running low on fuel at 1/4 tank...I really did not want to have to worry about that.
before I removed the bed I climbed under the truck and looked at where the bed cross members went over the tank...I marked each side of the crossmember with a paint pen on the tank so once I removed the bed I could see where the crossmembers went.
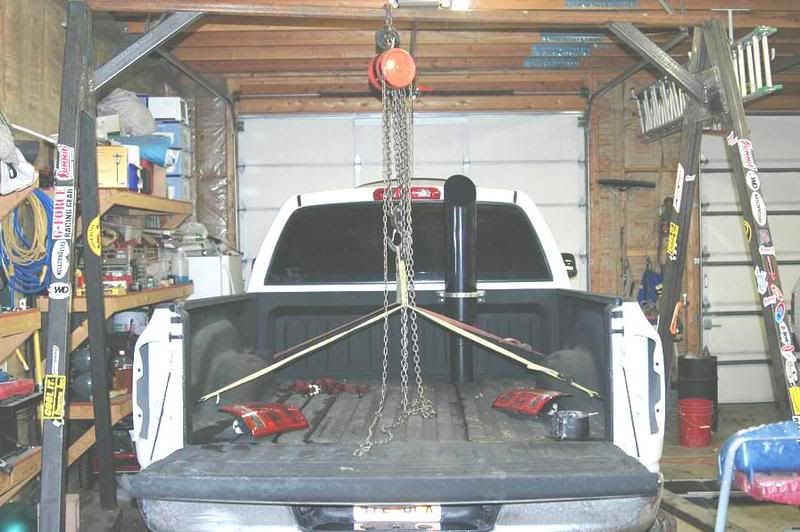
I thought that taking the bed off would be a big PAIN but to my surprise it was VERY simple...all it takes is 3 bolts on each side total of 6 bolts, you also have to remove the taillights so that you can take the electrical plugs off the light housing's...then on my truck there was one small ground wire on the passenger front corner of the bed that mounts to the cab..this must be removed too dont forget to disconnect the filler and tank vent as well.....since I have a stack I also had to remove my stack...I just left the stack clamped to my Staxxclamp and disconnected the stack under the bed.
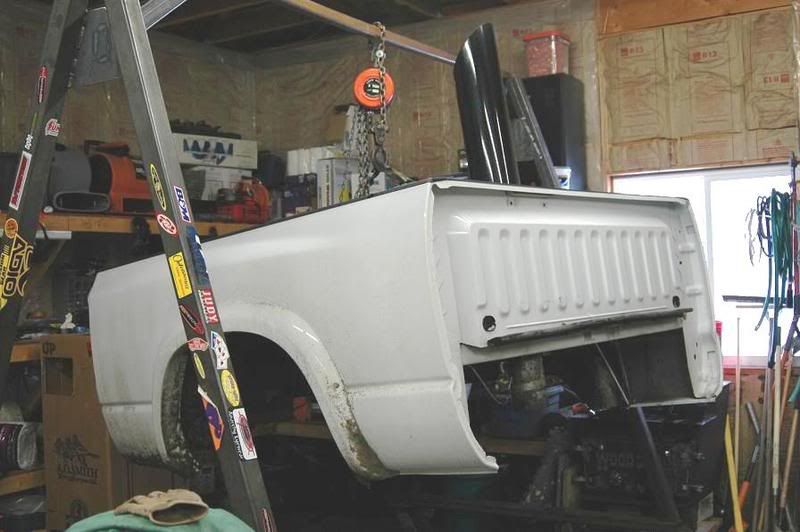
I have a crane that I used to remove my bed but it is pretty lite and could be moved with 2 guys on each side really easy.
http://i81.photobucket.com/albums/j240/53willys/Dodge%20Stuff/DSC_0908.jpg
http://i81.photobucket.com/albums/j240/53willys/Dodge%20Stuff/DSC_0887.jpg
after I pulled the bed I started on the Drawstaw and tank vent mod bulkhead install...on the megacab there is not really any flat spots to mount the drawstaw except right in front of the stock fuel module. I was a little worried about it being mounted in front of the module but that is the only option on a megacab unless you do the liberty fuel module.(i was being cheap and did not want to pay for a new module)
once the bed is off you need to remove the stock fuel module so you can hole saw the holes into the tank...make sure to use a cup inside the tank to catch any chips or shavings that may fall through.
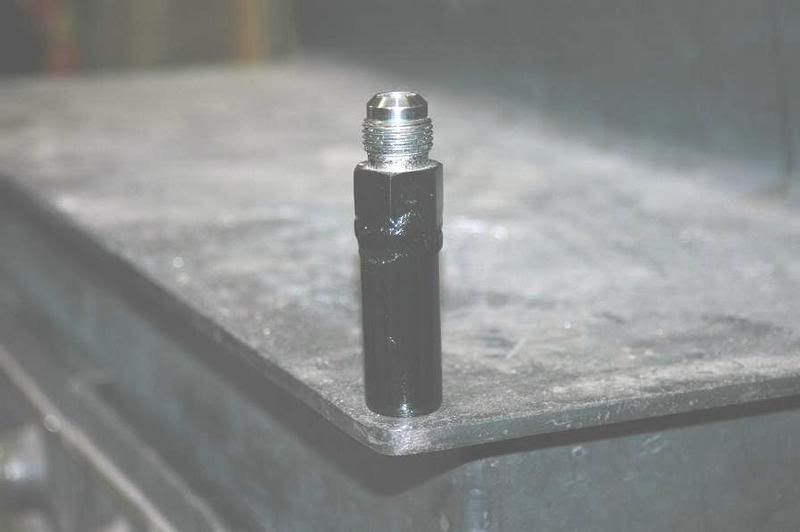
The Vulcan drawstraw instructions said to cut the pick-up at a slight angle but I did not like the sound of the angle cut and was afraid it would suck air when the tank got low...so I cut mine straight and left about 1/16" of gap on the bottom..I found a washer in the shop that was just a hair over 1/16" and used it to fine tune the cut on the bottom of the drawstraw...it better to make 20 small cut then to try and get it perfect in the first cut..least for me it is...
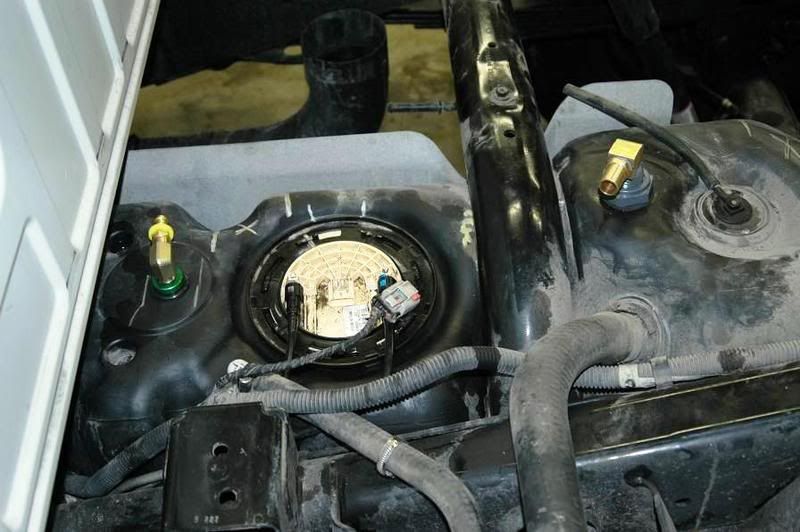
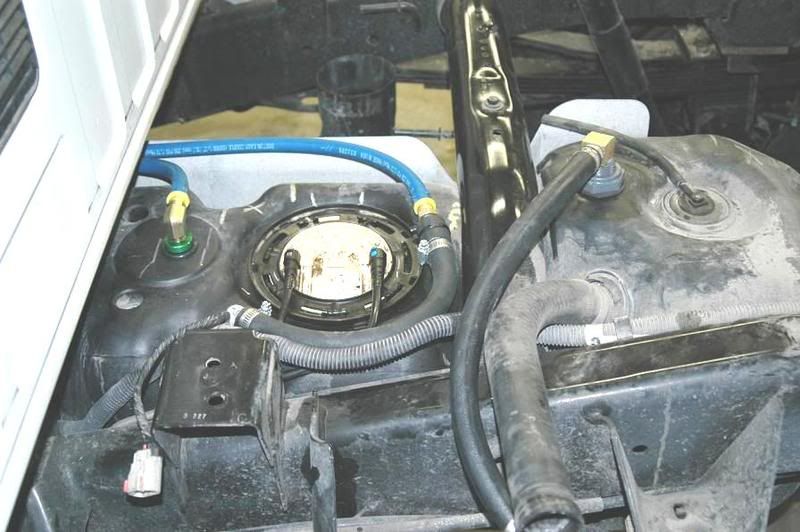
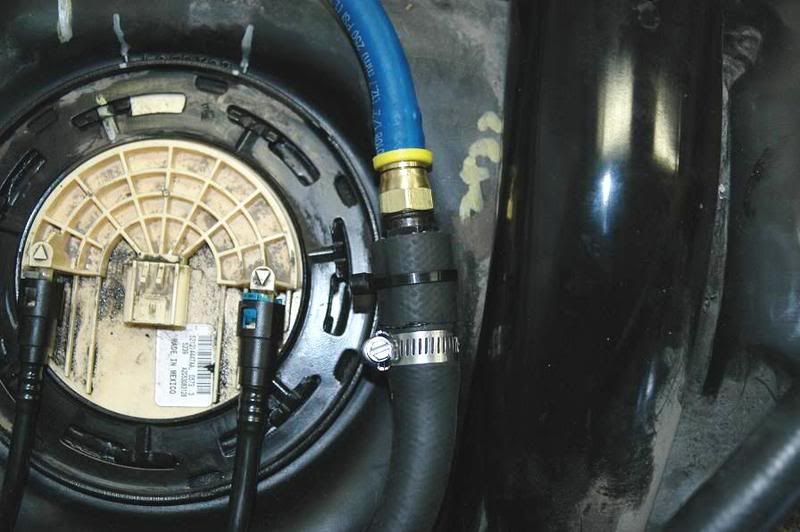
here is a shot of what mine looked like after the install was done..*Note in this pic the plastic bulkhead fitting is on backwards the treads and the nut need to be on the inside of the tank not the outside other wise the washer will flare out and not seal.
also note the silver paint marks on the tank with the X in the middle that is where the bed cross members are so dont mount anything in that space.
also before you drill the hole for the Drawstaw make sure it will clear the tank baffle inside..I was going to take a pic of it but I got going and forgot...I dont know if all the tucks have the baffle in the tank but my megacab tank did.
http://i81.photobucket.com/albums/j240/53willys/Dodge%20Stuff/DSC_0888.jpg
I left my factory feed line on for now.
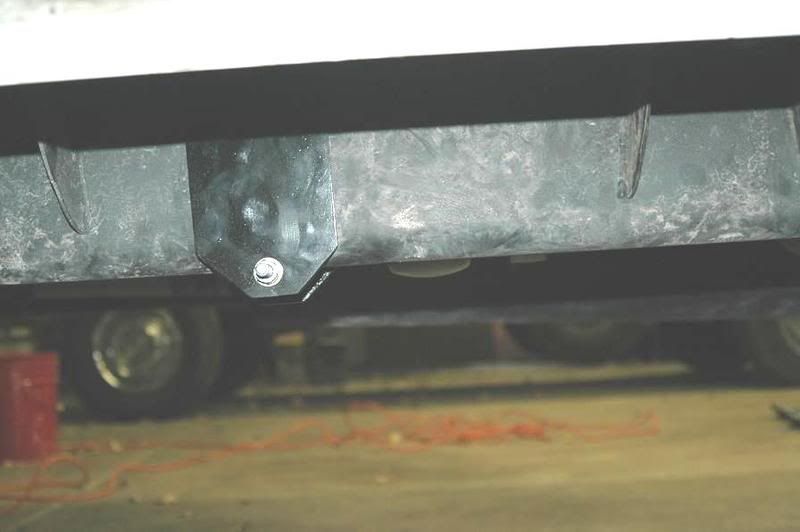
the tank vent mod is pretty easy all you do is remove the factory hose and then mount the bulkhead on a flat surface as high on the tank as possible.
I also bought a brass 90*,3/4" a hose barb adapter and 4 feet of 3/4" diesel rated hose.
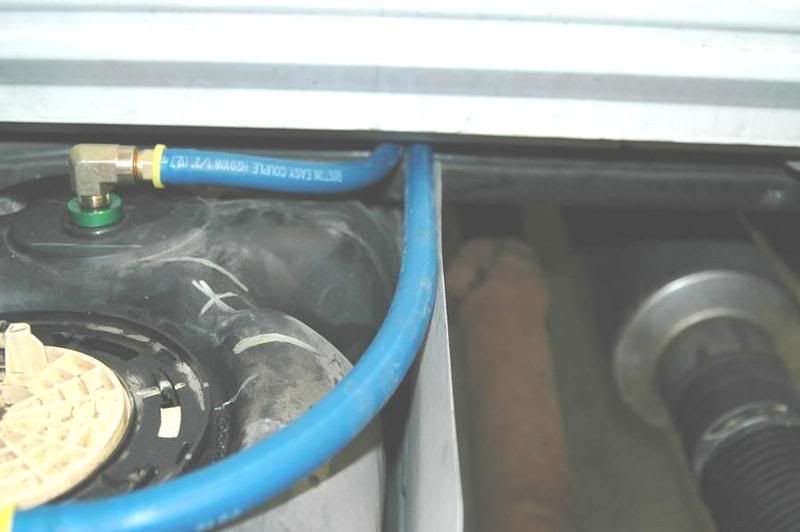
instead of capping the factory vent hose I removed it and and added a about 6"-8" of the left over 3/4" hose, then instead of cutting the factory filler hose and adding the airdog return fitting I cut the 8AN fitting off and welded a piece of 3/4" pipe on the end so I could use the old vent as a airdog return.
here is what it looks like now.....
http://i81.photobucket.com/albums/j240/53willys/Dodge%20Stuff/DSC_0896.jpg
http://i81.photobucket.com/albums/j240/53willys/Dodge%20Stuff/DSC_0898.jpg
just cut the vent hose to be about the same length as the filler hose and you should be good...then you can see in the pic I wrapped some hose around the metal return fitting so it would not rattle against the crossmember.
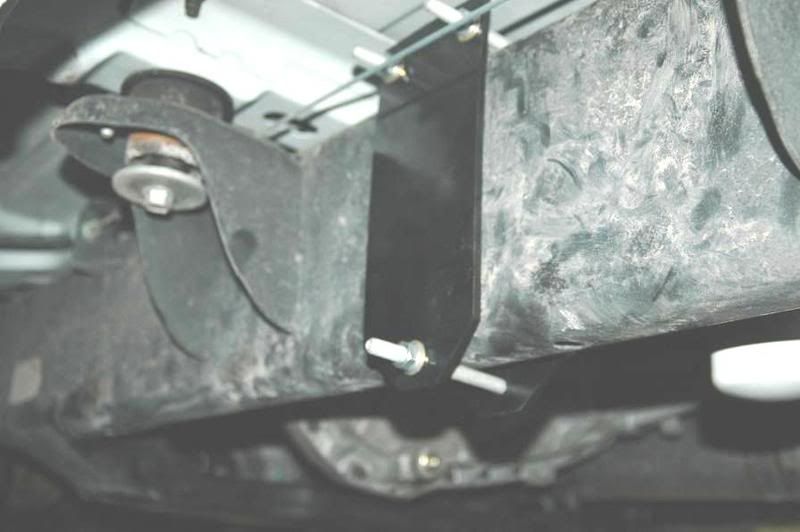
Now it was time to mount the Airdog....I soon found out they sent me the wrong sandwich bracket (old 2nd gen version)..it was too short to fit my frame..by this time it was to late in the day to call so I just made a new bracket myself...I wanted to mount my AirDog parallel to the frame instead of parallel to the transfercase....this was actually easier then I thought it would be all I did was cut the old airdog mounting plate off of the sandwich plate..then I just welded it to point backwards/parallel to the frame..I also had to cut a grove out of the bracket to allow for the factory return line..
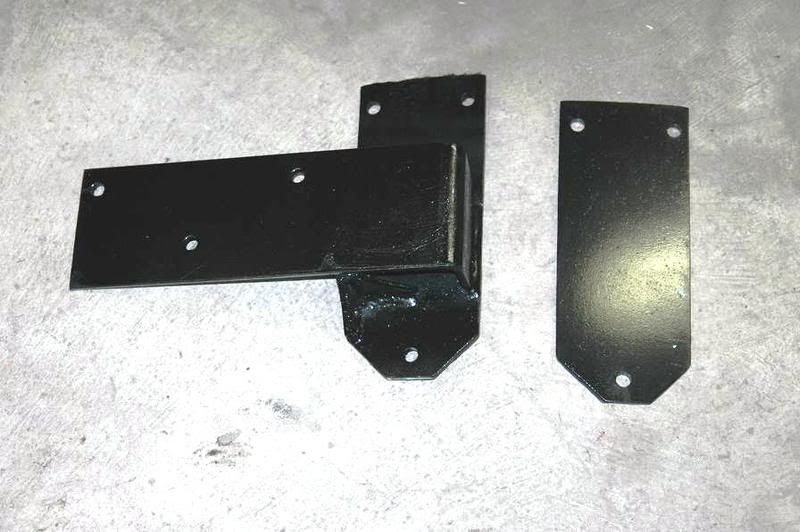
here is what my bracket looked like when I was done...
you can see that I welded a couple gussets on just to add some strength.
you can also see the small angle cut I made for the return line on the top right of the bend.
http://i81.photobucket.com/albums/j240/53willys/Dodge%20Stuff/DSC_0894.jpg
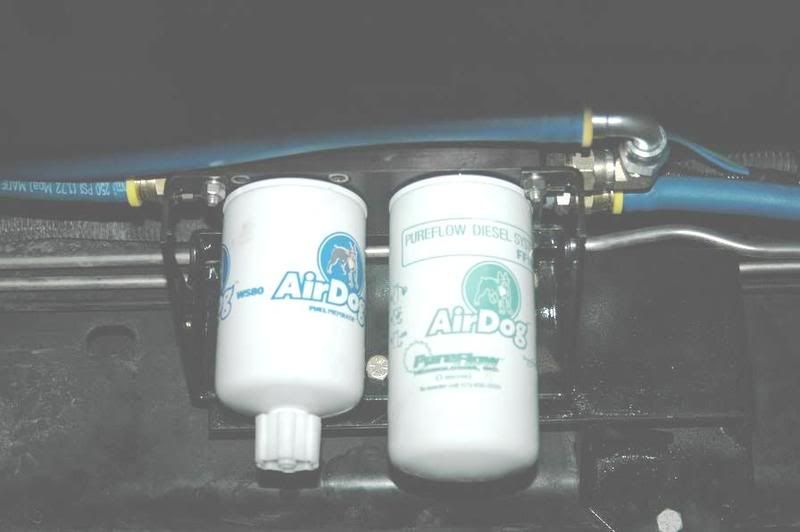
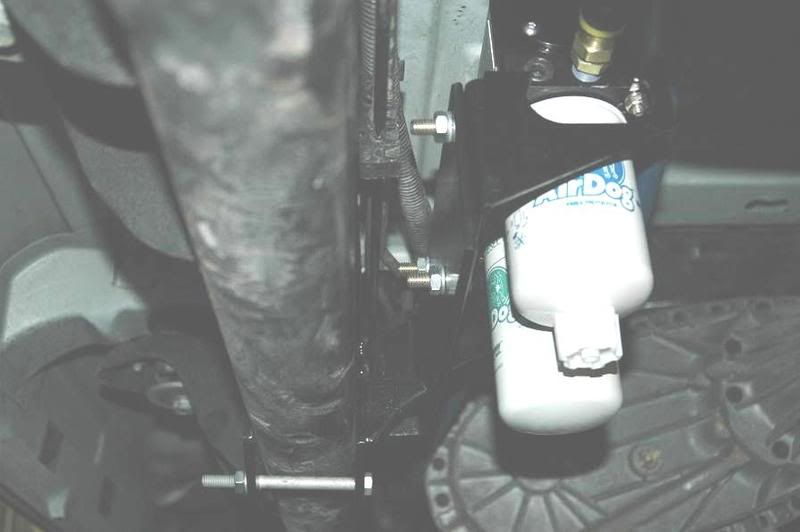
here is what it looks like installed....I mounted mine with the CP3 fuel supply line and the return pointing to the front of the truck..witch makes the tank suction line come in from the back..then you have to route the return line back to the tank...if you mount it parallel to the frame with the Airdog stickers pointing out you would have to run the lines from the back to the front...doing it my way makes for a cleaner looking install IMHO
http://i81.photobucket.com/albums/j240/53willys/Dodge%20Stuff/DSC_0906.jpg
http://i81.photobucket.com/albums/j240/53willys/Dodge%20Stuff/DSC_0907.jpg
http://i81.photobucket.com/albums/j240/53willys/Dodge%20Stuff/DSC_0905.jpg
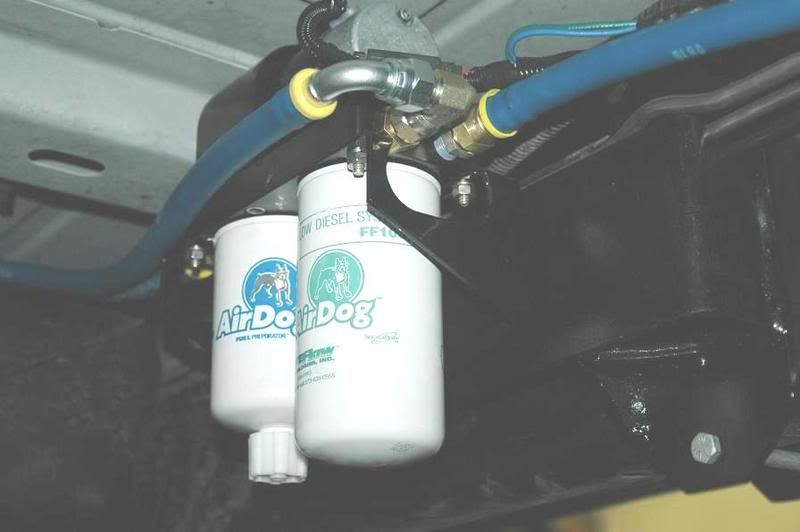
more pics of the installed airdog.
http://i81.photobucket.com/albums/j240/53willys/Dodge%20Stuff/DSC_0904.jpg
You can see the filter bottom in this pic...it does not hang lower then the frame it is about even with it tho.
http://i81.photobucket.com/albums/j240/53willys/Dodge%20Stuff/DSC_0903.jpg
After you mount the AD it is time to start cutting the fuel lines to fit....pretty easy really just route the line to each fitting and cut to length....MAKE SURE TO USE SOME OIL TO LUBE THE PUSH LOCK FITTINGS OTHER WISE THEY WILL NEVER GO ON ALL THE WAY OR COME OFF..so you will have to cut the hose off and you may be short on hose if you do..
http://i81.photobucket.com/albums/j240/53willys/Dodge%20Stuff/DSC_0902.jpg
return line connection.
http://i81.photobucket.com/albums/j240/53willys/Dodge%20Stuff/DSC_0900.jpg
Still need to zip tie the lines up so they dont bounce around of get chaffed.
http://i81.photobucket.com/albums/j240/53willys/Dodge%20Stuff/DSC_0899.jpg
This is what I used to hook the FP gauge up to the CP3.
http://i81.photobucket.com/albums/j240/53willys/Dodge%20Stuff/DSC_0901.jpg
**Update**
So after some time driving this set up I had become very annoyed by the fluctuating fuel pressures at 1/4 tank..it was like a switch soon as the needle touches the 1/4 tank line on the gauge...I would start to get 0 psi readings at "take off", slowing to a stoplight, or going down a hill or up...it drove me nuts!!!!! the whole point of the system is to keep air out....
So I decided that I would maybe save some cash by moding my stock fuel canister instead of buying a liberty canister....it went pretty well...here is what I did...
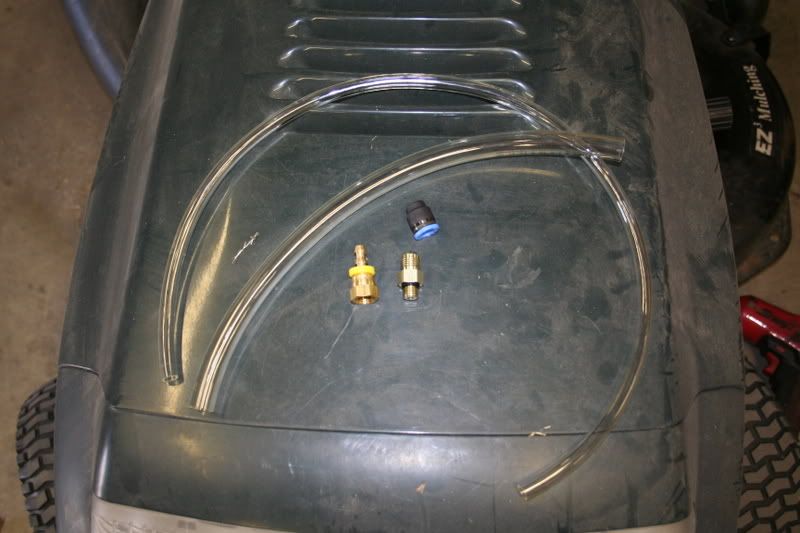
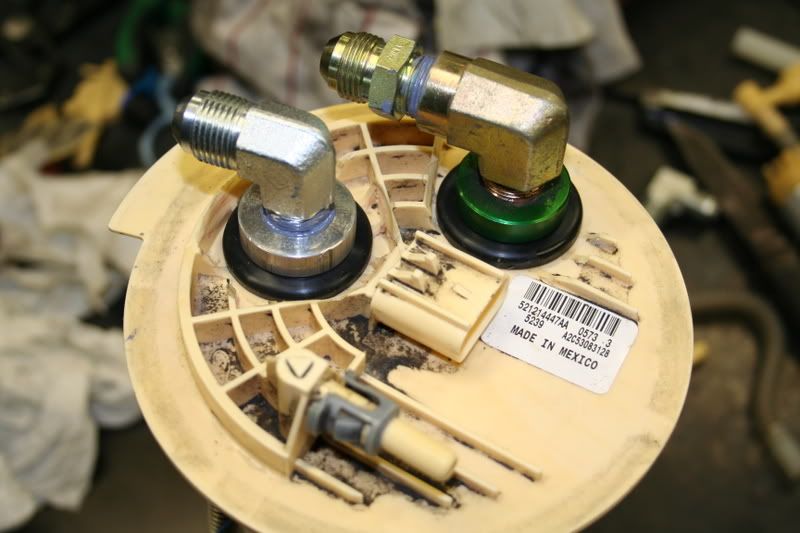
this First pic is of the parts I used to mod it...the small black cap was NOT used..
http://i81.photobucket.com/albums/j240/53willys/Dodge%20Stuff/IMG_0565.jpg
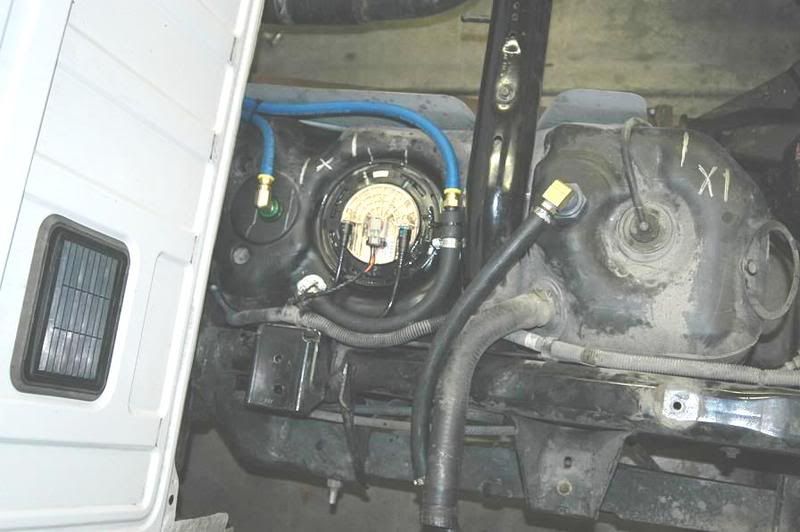
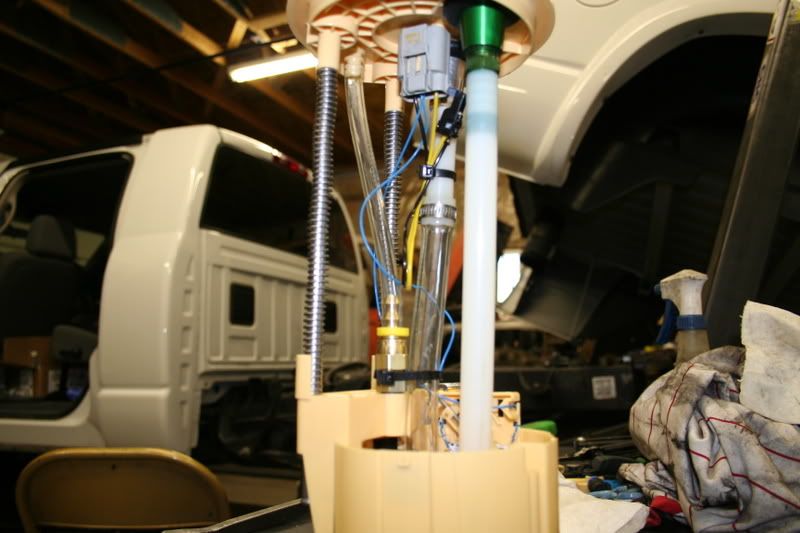
my plan was to have the stock engine return stay where it is..then I would plumb a 1/2" pick-up and the a 1/2" return for the AD150 ALL inside the stock canister...my thinking is the Airdogs return fuel will help keep the can full even when the tank gets down to 1/4 tank.
so you have a..
stock engine return line
Airdog return line
Airdog suction line
all plumbed into the top of my stock 06 canister.
http://i81.photobucket.com/albums/j240/53willys/Dodge%20Stuff/IMG_0570.jpg
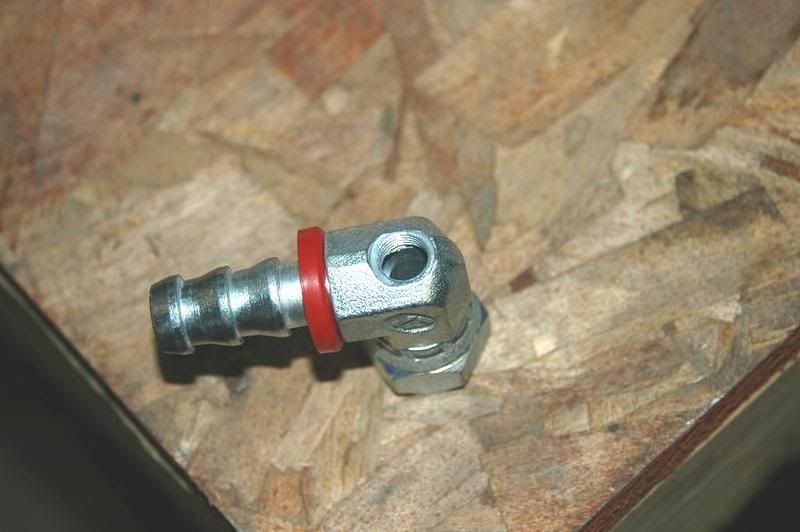
in the pic above you can see the BOSS O-ring fitting 4 AN(3/8") that I screwed into the bottom part of the canister..I was going to tap some threads into the plastic BUT the BOSS fitting screwed right in...and the o-ring even ended up seating down into the canister bevel...it's like it was made for it...then you use a 3/8" push-loc with a 4AN swivel..
I used ether hose...when I asked about a fuel line that could be submerged they told me that I should NOT submerge regular hose like what comes with the airdog...it needs to be rated for submersion IN diesel fuel...they said the ether hose would be perfect for that.
so you can see the clear ether hose that I plumbed up to the engine return port..all this does it help drop the fuel right into the canister...just like stock.
http://i81.photobucket.com/albums/j240/53willys/Dodge%20Stuff/IMG_0569.jpg
here you can see I modded my Vulcan drawstraw so that I could put a bigger piece of the ether hose on the end and use it as a FLEXIBLE pickup...the hose fit really tight but I put a clamp on it just to be safe...I also zip tied the stock fuel pump wires out of the way.
http://i81.photobucket.com/albums/j240/53willys/Dodge%20Stuff/IMG_0572.jpg
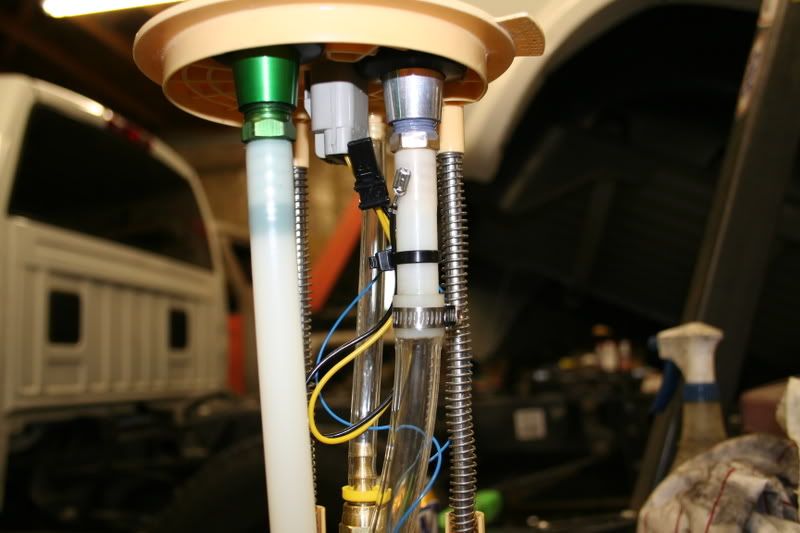
this is a shot of the return line with a hard line attached to help direct the airdogs return fuel back to the canister. (note the extra pick-up holes I drilled in the bottom)
http://i81.photobucket.com/albums/j240/53willys/Dodge%20Stuff/IMG_0571.jpg
the zip tie on the big clear hose is to help keep the hose inplace..I would hate to have it move and block the fuel gauge float movement..
http://i81.photobucket.com/albums/j240/53willys/Dodge%20Stuff/IMG_0567.jpg
http://i81.photobucket.com/albums/j240/53willys/Dodge%20Stuff/IMG_0566.jpg
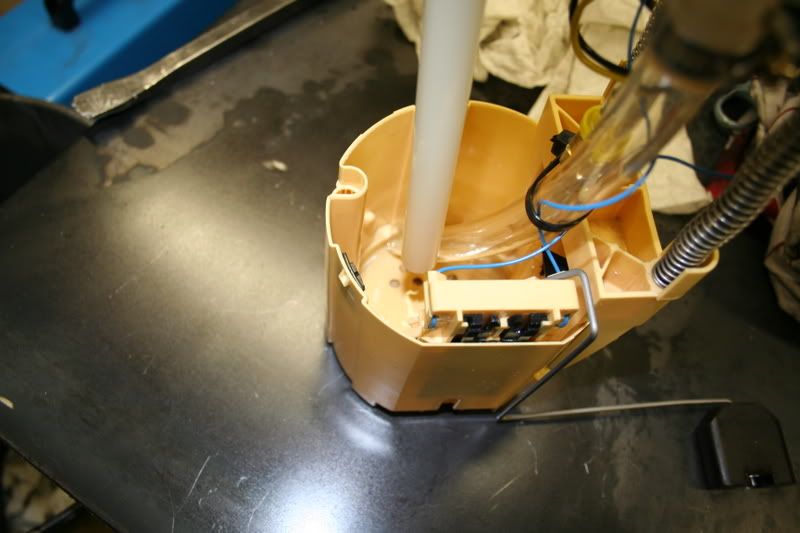
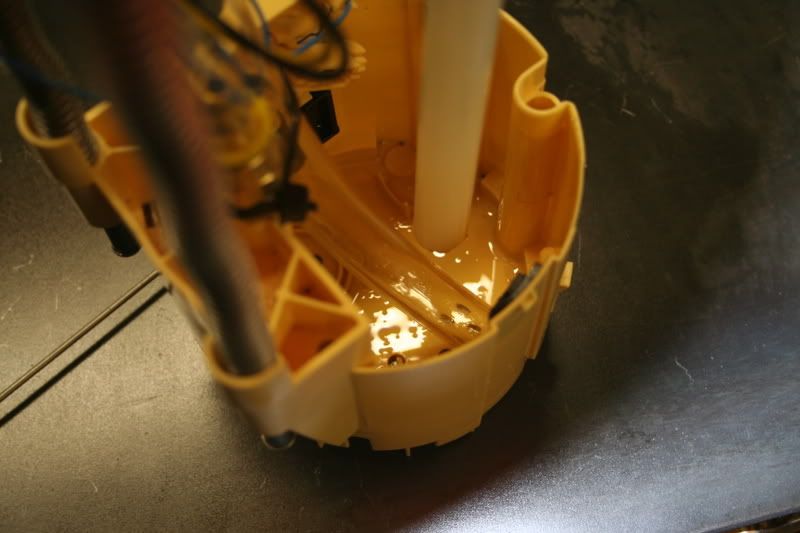
I tried to get the pics the best I could...here is what I did....drilled 5 more holes in the bottom of the canister..I did not get a pic of it but there is a small screen on the bottom of the canister just take a small screw driver and pop it off to access the bottom for drilling..I drilled the holes about the same size as the stock holes..I think they were 21/64 or something??
there was NO WAY to retain the factory flapper valve set-up..like what the liberty can uses..but I am not convinced it is needed at this point...
http://i81.photobucket.com/albums/j240/53willys/Dodge%20Stuff/IMG_0568.jpg
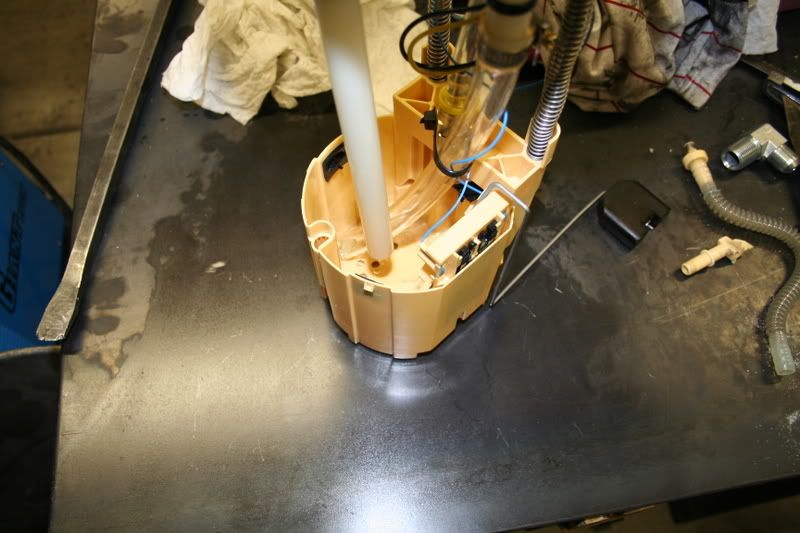
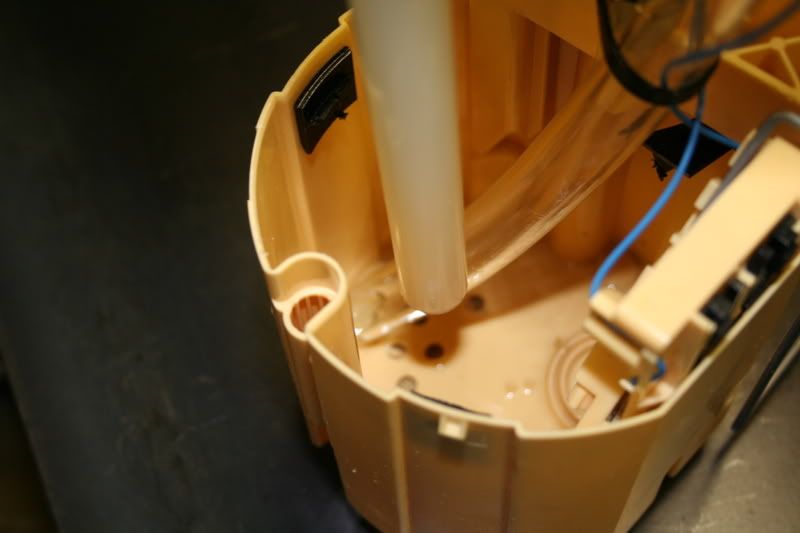
as you can see you have to mod the top support grids on the canister in order to make the vulacn drawstraw fit...I used a 90* angle grinder with a course 3M scotch brite pad(worked really well!!) you also have to do the same to the bottom side...
the pick up tube was kinda tricky to get set....I cut a small "V" out of the corners to make sure when it was compressed by the springs on the canister that it did not close off the flow or kink any lines....the ether hose on the engine return line keep wanting to kink so I had to preload the springs buy making the line a little shorter...not a big deal...but you need to make sure it is not kinked other wise you could have some issues on your hands.
So hows it work??????
I LOVE IT!!!!!!!
I have super solid pressure now before it was all over the place at 1/4 tank..but now on the same hills it was fluctuating on, it now holds 17psi..the only time I was able to get the FP to drop was on a big hill while stopping...and it did not go to "0" psi like it did before it went to 9 psi and then bounce right back to 17psi...I LOVE IT!!!! before on the same hill the FP would go to "0" then it would bounce up to 17psi and then back to "0"...you could actually watch the fuel sloshing buy the readings on the FP gauge.
so now I have ALL my tank capacity back and I dont have to watch the FP going all over the map...I am really happy with the mod so far...I even filled the truck to just 1/4 tank to make sure I was good...and I am.... I can take it all the way into the red on the gauge now with NO "0" psi readings!!!!!
Note...make sure you blow out your stock fuel supply line when you finally disconnect it, other wise it will leak all over the tank and make you think you have a tank leak( I almost pulled my bed back off..before I realized where the leak came from)
I think I covered most the install???? if you have questions just ask.
there is a lot of cutting in this mod...you pretty much have to gut the factory canister....
I spent $8 for the hose and the fittings and also had to buy a new pick-up/drawstraw
I am happy with the results!!
you would have to buy the same drawstraw to mod a liberty canister to work with a AD150...so this does save some cash..if you have the tools to mod yours..
**Small Update**
thanks for the comments guys,
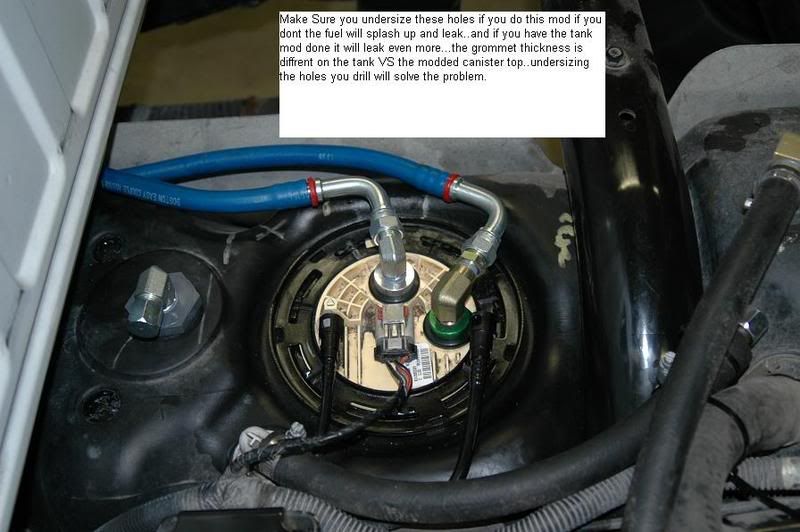
I am really happy with the way this mod has worked so far...the only problem I had was the grommet on the return line was kinda a loose fit so when I filled up it leaked.....the grommet does not fit perfect because the plastic on the tank is thicker then the canister plastic so...YOU HAVE TO DRILL IT UNDER SIZED or it will leak..one hole I drilled was undersized (AD suction/pick-up) the grommet on that one did not leak because it was tight...but the return line did..
I had to use some Super duty marine permanent sealer on the grommet...but this can all be avoided if you under size the hole!!!!!!!
http://i81.photobucket.com/albums/j240/53willys/Dodge%20Stuff/sendingunit.jpg
--Iker42 19:32, 16 March 2008 (EDT)